WireGuard is becoming popular with the linux crowd as a VPN as its integrated with the linux kernel whitch provides better performance.
However lot of tutorials and scripts that setup wireguard do so with NATing the IPv6 address and giving the user a link local IPv6 address. This causes the operating system to prefer IPv4 over IPv6. In this tutorial we will look at setting up a simple dual stacked vpn tunnel with global IPv6 support.
I will be using a t4g.nano server in aws eu-central-1 with Debian bullseye and use add a single /80 ipv6 subnet for the instance. Some of the steps will be different for your setup.
Network Setup
For this tutorial I will be only focusing on IPv6 network configuration.
You will need a subnet with /80 for this tutorial, However you can use smaller subnets with proper subnetting.
⚠️ Please substitute your own subnet and network interfaces when following the tutorial.
Original Block - 2a05:d014:926:ffaa:87dd::/80
- For the SSH - 2a05:d014:926:ffaa:87dd::1/128
- For the VPN Endpoint - 2a05:d014:926:ffaa:87dd::123/128
- For the VPN Clients - 2a05:d014:926:ffaa:87dd:ffff::/96
- VPN Endpoint port - 60002
- AWS network interface - ens5
We are also giving a single IPv6 for each client but you can also give a subnet per client. For a truly proper IPv6 config you can give each client a /64 subnet and configure SLAAC.
Run the following commands to add the ips to the interface
sudo ip addr add 2a05:d014:926:ffaa:87dd::1/128 dev ens5
sudo ip addr add 2a05:d014:926:ffaa:87dd::123/128 dev ens5
sudo ip addr add 2a05:d014:926:ffaa:87dd:ffff::/96 dev ens5
⚠️ You can also use tools like netplan to properly setup the IPs.
Make sure to add the following to /etc/sysctl.d/wg.conf
net.ipv4.ip_forward = 1
net.ipv6.conf.all.forwarding = 1
net.ipv6.conf.ens5.accept_ra = 2
Run following command to apply the changes.
sudo sysctl --systemInstalling WireGuard
To install WireGuard use the package manager of the system or follow the quickstart.
sudo apt install wireguardServer WG0 Configuration
In the IPv4 rules, we NATing the IPv4 address.
PostUp =  iptables -t nat -A POSTROUTING -o ens5 -j MASQUERADE;
PostDown = iptables -t nat -D POSTROUTING -o ens5 -j MASQUERADE;
In the IPv6 rules, we are adding a rule to forward traffic to the internet interface.
PostUp = ip6tables -A FORWARD -i ens5 -o wg0 -j ACCEPT; ip6tables -A FORWARD -i wg0 -j ACCEPT;
PostDown = ip6tables -D FORWARD -i ens5 -o wg0 -j ACCEPT; ip6tables -D FORWARD -i wg0 -j ACCEPT;
For the client IP we are using the first IPs of the designated range. In IPv6 you can allow a large subnet here and it will allow the client to move around within different IPs of the subnet.
AllowedIPs = 10.66.66.2, 2a05:d014:926:ffaa:87dd:ffff::2/128Below is the full config. Save the file in /etc/wireguard/wg0.conf
[Interface]
Address = 10.66.66.1/24, fd42:42:42::1/64
ListenPort = 60002
PrivateKey =
PostUp =  iptables -t nat -A POSTROUTING -o ens5 -j MASQUERADE; ip6tables -A FORWARD -i ens5 -o wg0 -j ACCEPT; ip6tables -A FORWARD -i wg0 -j ACCEPT;
PostDown = iptables -t nat -D POSTROUTING -o ens5 -j MASQUERADE; ip6tables -D FORWARD -i ens5 -o wg0 -j ACCEPT; ip6tables -D FORWARD -i wg0 -j ACCEPT;

### Client 1
[Peer]
PublicKey =
#PresharedKey =
AllowedIPs = 10.66.66.2, 2a05:d014:926:ffaa:87dd:ffff::2/128
To start the tunnel run the following command
sudo wg-quick up wg0Client Configuration
Here we are allowing a single IPv6 address. If the server config is allowing a large subnet, we can change it accordingly.
Address = 10.66.66.2, 2a05:d014:926:ffaa:87dd:ffff::2/128Below is the full config. Save the file in /etc/wireguard/client1.conf
[Interface]
PrivateKey =
Address = 10.66.66.2, 2a05:d014:926:ffaa:87dd:ffff::2/128
DNS =  2606:4700:4700::1001

[Peer]
PublicKey =
#PresharedKey =
AllowedIPs = 0.0.0.0/0, ::/0
Endpoint = [2a05:d014:926:ffaa:87dd::123]:60002
To start the tunnel run the following command in linux.
sudo wg-quick up wg0Testing
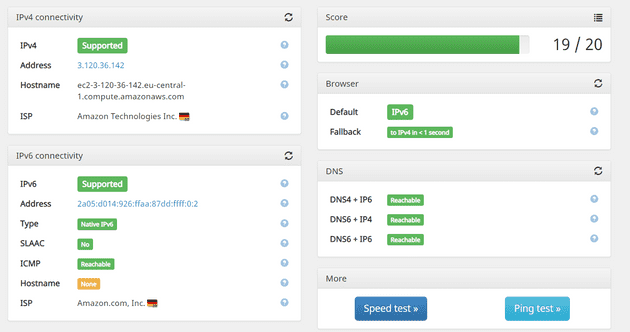
After setting up the VPN you can test the connetion by going to test-ipv6.com
You can see that the IPv6 address is preferred over the IPv4 address.
